Track Appearance
Overview
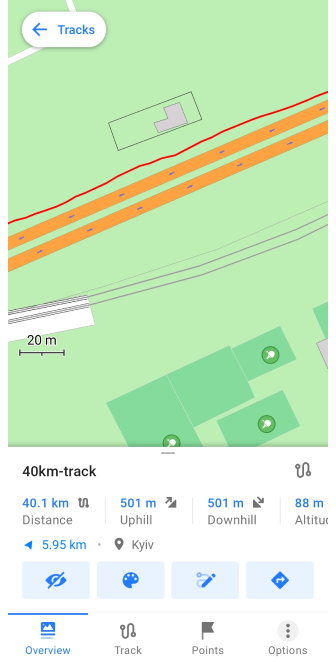
The Track Appearance feature allows users to customize how tracks are displayed on the map. This includes adjusting color, width, direction indicators, and other visual elements. Customizing track appearance helps differentiate multiple tracks, highlight specific routes, and improve map readability.
- Android
- iOS
Access to the menu
You can modify track appearance using one of the following methods:
- From My Places. Open Menu → My Places → Tracks, select a track, tap the Appearance icon in the track context menu.
- From the map. Tap a track directly on the map, then tap the Appearance icon in the Overview section.
- From track recording. Modify the appearance of the currently recorded track via the track recording context menu.
- From the Configure Map menu. Go to Menu → Configure map → Tracks → ⋮ → Change appearance for the displayed tracks.
Track Appearance Settings
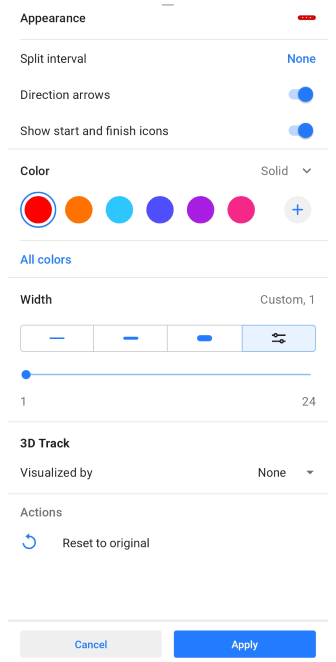
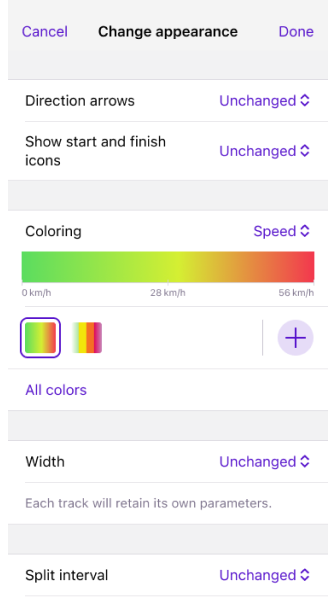
Color
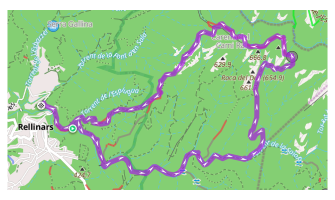
You can set the track color manually or use color-based data visualization (e.g., speed, altitude, slope). If a track lacks certain data, OsmAnd displays missing sections in gray.
Available Color Options:
- Free settings: Solid color, Speed (if recorded) and Altitude (if recorded).
- Pro feature: Slope, Road type, Surface, Smoothness, Winter and ice roads, Surface, Difficulty of horse trails.
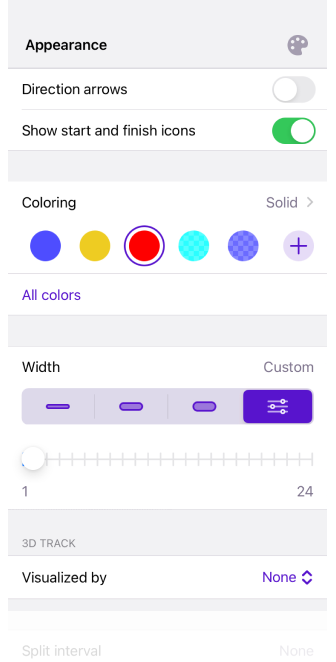
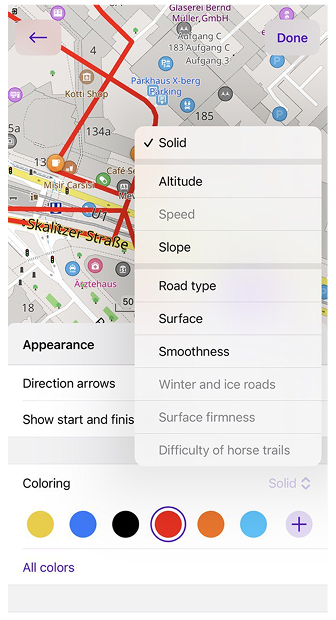
On IOS the Coloring list opens as a context menu. Items can appear in three states:
- Enabled. Can be applied to the current track.
- Disabled. The track lacks the required data.
- PRO. Available for the current track but requires a subscription; tapping opens the Choose plan screen.
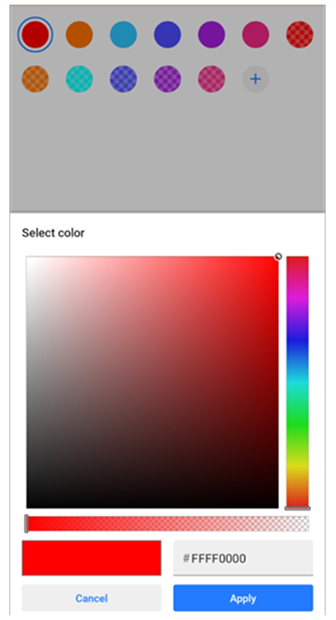
For more details on route line appearance customization, see Map screen during navigation and on selecting and creating a custom color, see Color schemes.
Color Palette Editor
This feature is currently not available for the iOS version of the OsmAnd app.
When coloring a track by Speed, Altitude, or Slope, you can use own palettes to define how colors are applied along the track.
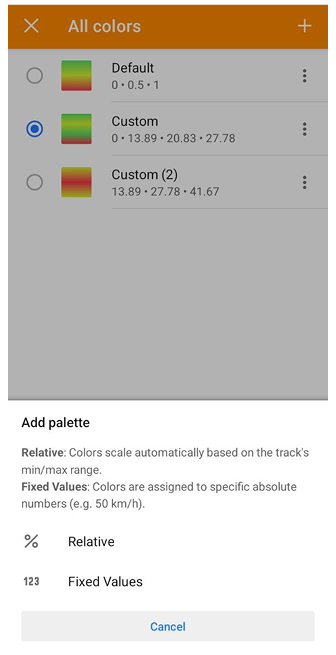
The All colors screen displays available palettes. Tap the three-dot menu next to a palette to:
- Rename.
- Edit.
- Duplicate.
- Remove. Removing a palette requires confirmation.
Tap the + button on the All colors screen. Two types of palettes are available:
- Relative — colors scale automatically based on the track’s minimum and maximum values.
- Fixed Values — colors are assigned to specific absolute numbers (for example, 50 km/h). Values can be edited manually. Units follow the system settings. The color scale does not rescale automatically when applied to different tracks.
Creating custom palettes is an OsmAnd Pro paid feature  .
.
To learn more about color palette schemes as a data format and their usage in tracks and routes, see the Color palette schemes article.
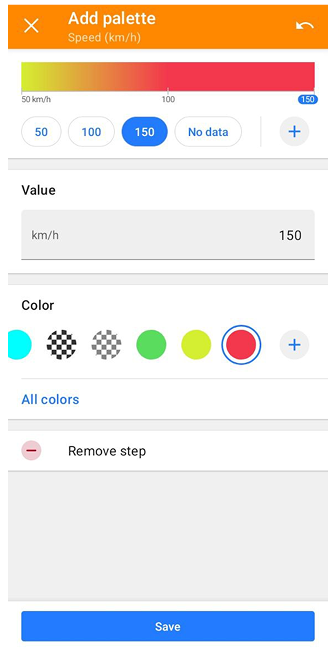
When creating or editing a palette, the editor screen includes:
- A color scale preview at the top of the screen.
- Selectable value buttons below the color scale (for example, 50, 100, 150, No data).
- A + button to add a new step.
- A Value field.
- Color selection options. For more information about palette files.
- A Remove step option for the selected value.
- A Save button.
Use the undo icon in the app bar to revert the last action. Tap Close to exit the editor. If changes were made, a confirmation dialog appears before closing.
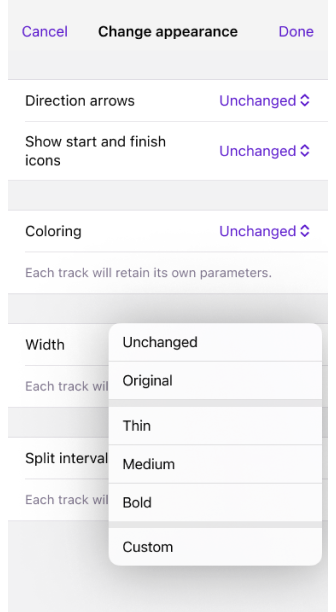
Width

You can customize the appearance of the track in several menus of the application:
- Track → Appearance.
- Navigation settings → Customize route line.
- My Places → Tracks tab → any folder → Default appearance.
Adjust track width to improve visibility on the map.
-
Preset options: Thin, Medium, and Bold.
-
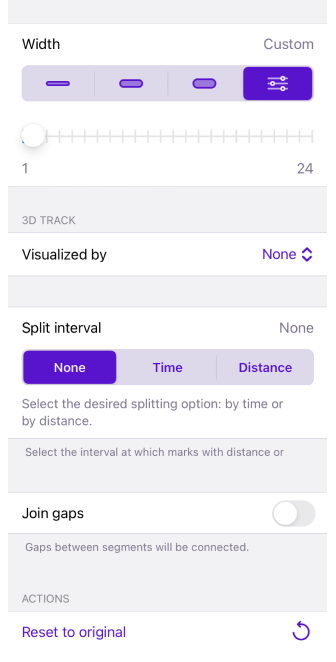
Custom width: Adjustable from 1 to 24 px using a slider.
-
Profile-based width: Can be set via Navigation settings → Customize Route Line.
Split Interval
- Android
- iOS


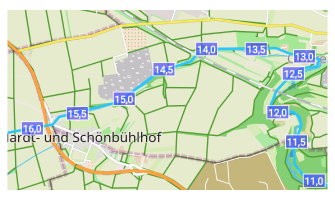
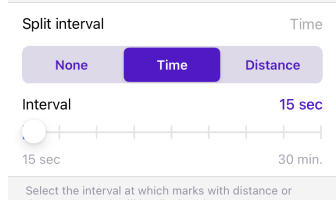
Select whether to split the track into intervals by distance, time, or uphill/downhill (Android), or by distance or time (iOS). To view detailed per-interval statistics, see Analyze by Intervals (Android only).
Direction Arrows
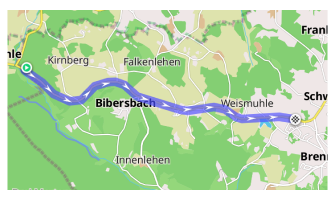
Adds arrow markers along the track to indicate movement direction.
Start and Finish Icons
![]()
Allows you to select whether to show the start and finish icons for track segments. For tracks with a large number of segments, these icons may be automatically disabled to improve map rendering performance. In this case, you can enable them manually if needed.
Join Gaps
Connects track segments that were interrupted due to GPS loss or a pause in recording. The Join segments (Android) or Join gaps (iOS) feature allows you to connect these gaps in the selected GPX track using straight lines.
Reset to Original
Restores all track appearance settings to their default values.
3D Track
3D Track Visualization is a paid feature.
- Android
- iOS
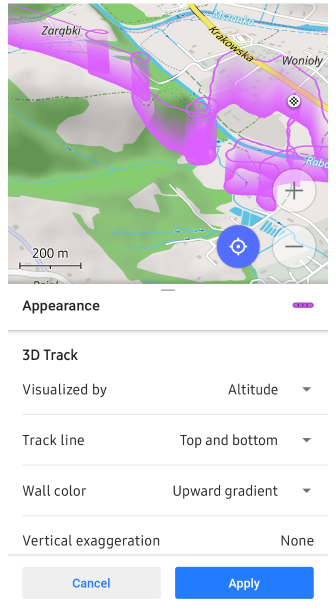
The 3D Track feature generates a three-dimensional visualization by integrating elevation data into standard 2D tracks. This functionality creates a depth-enhanced representation, enabling precise analysis of the track concerning the terrain. By incorporating elevation details, the 3D track offers a more comprehensive view of the route's topography and geographical context.
3D Track Settings
Wall height
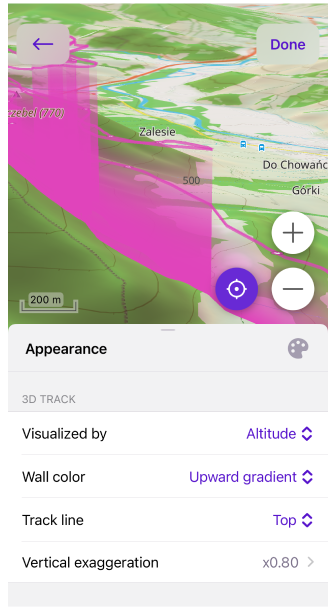
You can visualize a 3D track by altitude and other available data within the track, or by fixed altitude.
-
Visualized by: Altitude, Speed, Fixed Height. 3D Sensor data: Heart Rate, Bicycle Cadence, Bicycle Power, Temperature, Bicycle Speed.
-
Vertical exaggeration. If visualized by Altitude or Speed, you can scale 3D data to get a more prominent visualization for the 3D track in the range of None to x3.0.
-
Wall height. If visualized by Fixed Height, set the fixed height for the 3D track by defining its elevation on the map in the range of None to 2000 m.
-
You can combine it with 3D Relief. If the source of the 3D data is not altitude, the 3D representation will be a combination of relief altitude and the selected data, such as speed or heart rate.
Wall color
Customizes the 3D track color using gradients or data-based visualization.
Options include: None, Solid, Downward Gradient, Upward Gradient, Altitude, Slope, Speed.
Track line
Adds a highlighted lineline to the top or bottom of the 3D track.
Options include: Top, Bottom, Top and bottom.
NOTE: The Android version of the app requires the map rendering engine Version 2 (OpenGL) to be enabled to use 3D track visualization.
Use Cases
The 3D track feature is highly beneficial for activities like paragliding, where visualizing your flight path can offer deeper insights. By rendering the track in 3D, you can leverage features such as Wall Height and Wall Color to extract valuable visual information for analysis.
-
Visualize by Speed with 3D.
One common use case is utilizing 3D tracks to visualize speed variations. This allows you to pinpoint specific sections of the track where you slowed down or sped up.With Wall Color based on the Slope, you can observe how the terrain, particularly hills and inclines, impacted your speed. This combination of speed and slope visualization provides a detailed understanding of performance throughout the activity.
-
Visualize by Heart sensor with 3D Relief.
Another insightful application is combining heart rate sensor data with 3D relief maps. This allows you to map heart rate fluctuations directly onto the terrain, giving you a comprehensive view of how altitude changes may have influenced your physical effort.The 3D relief feature, which exaggerates the altitude, works independently of the 3D track view. Two vertical exaggeration parameters can be adjusted to better understand the correlation between heart rate and terrain elevation.
-
Visualize Track height and Slope color line on a flat earth view.
When visualizing altitude data, using a flat earth view is recommended to avoid issues like GPS errors, which might cause sections of the track to appear underground.In this scenario, slope changes can be visualized separately along the track line, while Wall Color utilized to represent altitude. This method ensures that even with potential data inaccuracies, you still receive a clear and accurate visualization of slope and elevation.
Change Appearance for Multiple Tracks
- Android
- iOS
The Tracks tab automatically displays all tracks ever recorded, created, or imported. They are organized by folder or displayed as a list below them.
Modify multiple track appearances in My Places → Tracks:
-
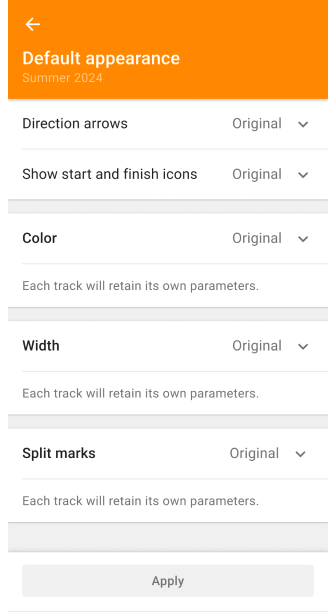
Change default appearance (Android only) - Allows to configure default settings which will be applied once track is added to the folder.
-
Reset to original - Restores individual track settings.
-
Selection mode - Changes the appearance of specific tracks in the selected folder or the entire list in the Tracks tab.
- Select the three-dot menu in the upper right corner of the Tracks tab and tap Select.
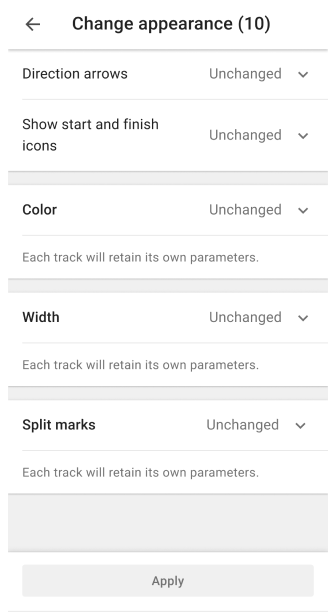
- Then tap the three-dot menu at the top of the screen and select Change Appearance.
Bulk appearance customization options:
-
Direction arrows - Adds movement indicators.
States: Unchanged, Original, On, Off. -
Show start and finish icons - Displays markers for track start and end points.
States: Unchanged, Original, On, Off. -
Color – Apply manual or data-based coloring.
-
Width – Adjust the track line width using presets or manually.
-
Split interval – Set interval for distance / time markers.
States: Unchanged, Original, Select: Time or Distance.
Original and unchanged:
-
Original - Restores the original parameters from the track file.
-
Unchanged - Keeps current settings during the editing session.
Track Colors in GPX Files
OsmAnd supports custom track colors in GPX files using the <osmand:color> tag within the <extensions> section of a <trk> element. This allows users to define colors for individual tracks, enhancing visual differentiation when multiple tracks are displayed on the map.
To specify a color for a track, use the following format:
<trk>
  <name>Example Track</name>
  <extensions>
    <osmand:color>#FF0000</osmand:color>
  </extensions>
</trk>
- The
<osmand:color>tag accepts hexadecimal color codes (e.g.,#FF0000for red). - If multiple tracks exist in a GPX file, each track can have its own
<osmand:color>tag.
Behavior in OsmAnd:
-
Default color assignment:
- When a GPX track is imported as a single track (Import as one track option), the entire track is assigned the default GPX color (red).
- In OsmAnd 4.9.10 and later, this issue has been resolved—individual track colors are now preserved upon import.
-
Single-color display for merged tracks:
- If tracks are merged using Join Segments, the resulting track is treated as one continuous track with a single segment.
- Multi-color representation is not supported for merged tracks.
- The merged track will be displayed using the main GPX color (default: red), even if individual track segments originally had different colors.
-
Priority of appearance settings:
- OsmAnd currently supports color and width settings only for the entire track.
- These appearance settings are stored in the top-level GPX extensions.
- If a color or width is set at the top level (either in the GPX file or manually in OsmAnd), this setting will take precedence over colors assigned to individual track segments.
Workaround for Multi-Color Tracks:
-
To preserve individual colors for multiple tracks, import tracks separately instead of merging them.
-
Adjust track colors manually in Track Appearance Settings:
- Open the track in OsmAnd.
- Tap the track to open the Context Menu.
- Select Appearance.
- Choose the preferred color.
-
This ensures that each track retains its intended color representation, even if the GPX file originally contained multiple segments with different colors.