Quick Action (Custom buttons)
Overview
Quick Action widget is an interactive user interface element that provides fast access to key functions or actions without opening additional settings. This widget is placed on the main map screen and allows you to simplify and speed up interaction with the application, making it more convenient and efficient.
Quick Action Widget
- Android
- iOS
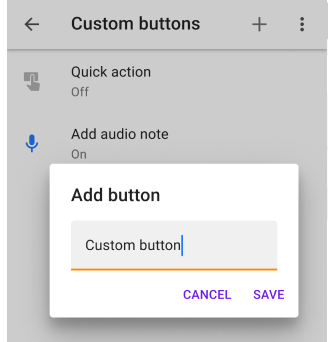
Go to: Menu → Configure screen → Custom buttons → Quick action
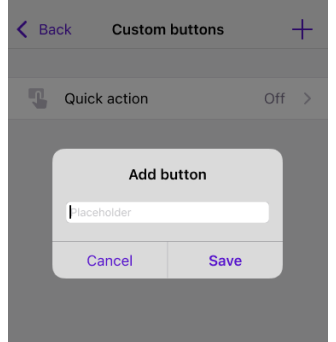
Go to: Menu → Configure screen → Custom buttons → Quick action

To use the Quick Action button, you have to enable this widget first.
Add and Delete Actions
- Android
- iOS
Go to: Menu → Configure screen → Custom buttons → Quick action → Tap Delete (Bin icon on the right top corner) → Select actions
Go to: Menu → Configure screen → Quick action → Tap Edit (Pencil icon on the right top corner) → Select actions
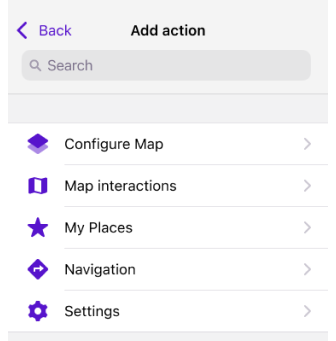
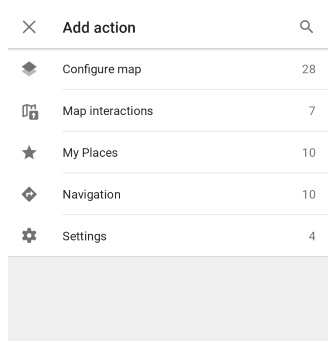
All actions are organized in the Add Action menu and grouped by type. A complete list of actions and their descriptions can be found in the Action types section.
You can assign one or more actions to the quick action button. There are two ways to add actions.
- In the Configure screen. Select a button from the list, and tap the "+" button. You need to select the action type first, and then change its name and parameters.
- In the quick action button panel. Tap the Quick Action button on the map screen. At the end of the list, on the latest screen in the panel, is the "+" Add Action box. Tap it and select an action from the list of types.
- Each action must have a unique name.
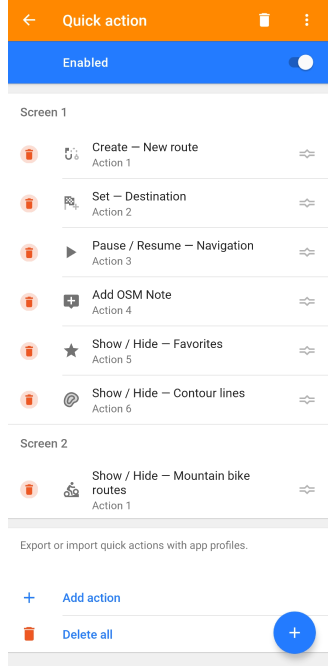
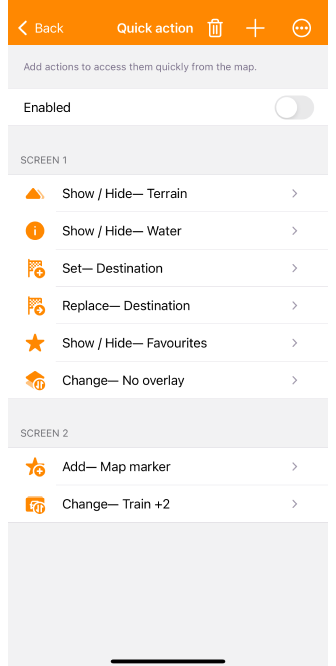
- The screens, labeled numerically as Screen 1, Screen 2, etc., are created automatically when the number of actions in the list increases to 6 items.
Action Parameters
- Android
- iOS
The actions assigned to a quick action button are grouped into screens. These groups of actions are opened when you tap that button on the map. New screens are automatically created when the list of actions exceeds 6 items. You can rearrange actions to suit your preferences by following these steps:
For Android.
-
Via configure screen:
- Go to Menu → Configure screen → Custom buttons → Quick action.
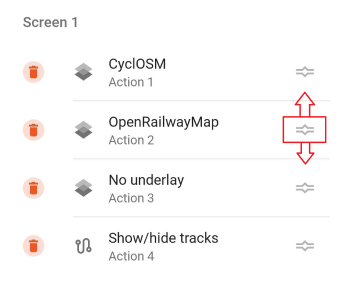
- Use Hold & Drag on the two vertical lines icon to rearrange actions.
-
Via quick action menu:
- Open the quick action menu, then long tap Add Action.
- Use Hold & Drag on the two vertical lines icon to rearrange actions.
For iOS.
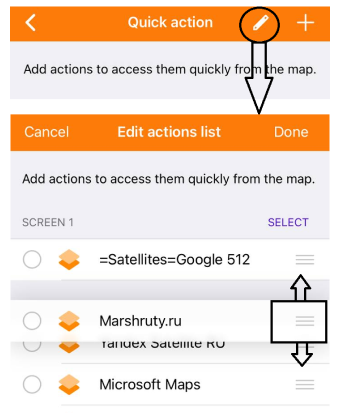
- Navigate to Menu → Configure screen → Quick action.
- Tap Edit (pencil icon), then Hold & Drag on the three vertical lines icon to rearrange actions.
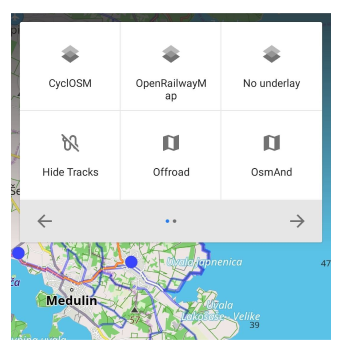
Some actions such as Map source, Map style, Overlay, Underlay, Terrain color scheme, and Add profile can be assigned as a loop. Each tap on the button cycles through the selected layers. An interim dialog can be shown to select from the list manually, or hidden to switch in the defined order.
Buttons on the Screen
Custom buttons
- Android
- iOS
Go to: Menu → Configure screen → Buttons → Custom buttons → "+" → Add button
Go to: Menu → Configure screen → Buttons → Custom buttons → "+" → Add button
Custom buttons are additional buttons on the map that act the same as the Quick Action button. You can create a button with one or more actions and display it on the map screen. Custom buttons are located in the Configure screen → Buttons → Custom buttons list. Each button has a profile-independent actions list and should have a unique Name, however, a button could be switched on/off individually for each profile.
All available actions are identical to those that can be applied to the default quick action. Custom buttons can be configured as Single-action buttons, which apply the selected action immediately upon being tapped, without the need to navigate through an extra menu.
Button Appearance
This feature is currently not available for the iOS version of the OsmAnd app.

You can modify the appearance of Quick Action buttons through: Menu → Configure screen → Custom buttons → Quick action → three-dot menu → Appearance. This setting provides options to personalize the button's size, shape, icon, and background opacity, offering greater control over how the buttons look on your screen.
For detailed customization settings, refer to the Configure Screen article, where you can learn how to fine-tune each button's appearance to match your preferences.
Change Button Position
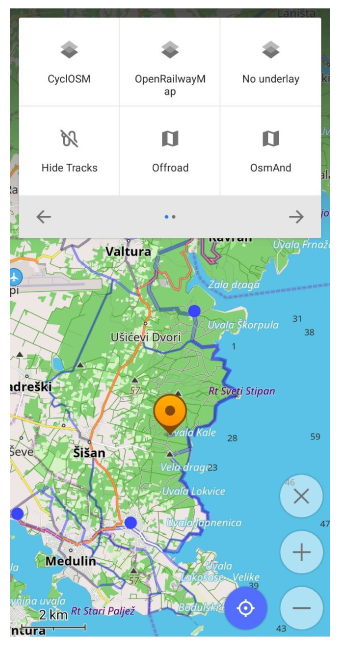
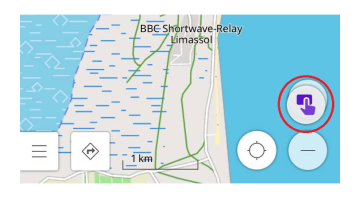
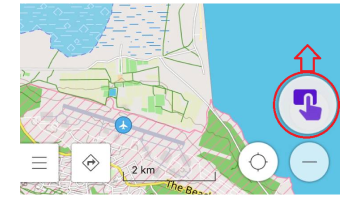
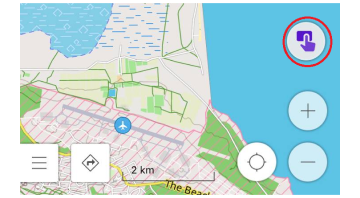
The Quick Action widget appears at the bottom corner of the map screen when you first enable it. You can move the widget to any part of the screen by holding and dragging. For precise and accurate placement of buttons on the map screen, they are automatically aligned to the nearest invisible grid position when dragged.
-
Initial appearance. By default, the quick action widget is placed in the lower right corner of the map interface.
-
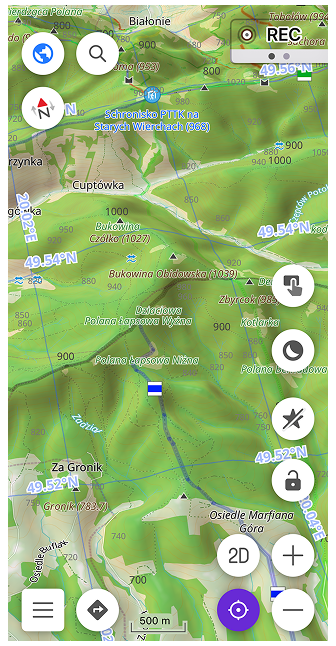
Move the widget. By long pressing and dragging the widget, you can reposition it on the screen, with automatic column and row alignment.
-
New placement. Once moved, the widget will remain in its new position on the map screen until manually adjusted again.
-
Multiple Custom buttons. You can add multiple quick action buttons to the map screen. These buttons can also be customized and repositioned individually using the same drag-and-drop method.

Grid Layout for Buttons
- Android
- iOS


Map buttons are automatically arranged using a grid layout. Each button is assigned to one of the four corners of the screen (top-left, top-right, bottom-left, bottom-right). If there is not enough space in the assigned corner, the buttons are aligned horizontally or vertically, depending on the screen orientation.
This layout helps keep buttons visually consistent and avoids overlapping. For example, on a landscape display, buttons in the right corner will line up horizontally at the bottom of the screen, while on a portrait display they will expand vertically upwards or downwards as needed.
The grid adapts to the surrounding interface and repositions buttons when required, ensuring they remain visible and do not interfere with other on-screen elements. When widgets or panels are added, removed, or rearranged, the layout updates accordingly so that button order stays consistent and no element becomes hidden.
Profiles imported from another device are adjusted to the grid layout, keeping button positions correct across different screen sizes and platforms.
Action Types
Configure Map
| Action | Description |
|---|---|
| Show / Hide Routes | You can select route types to enable or disable their display. Some routes have additional settings. By default, if you have not selected anything in the Configure Map menu, the first route type from the list will be assigned, otherwise, a type of your choice will be assigned. You can read more in the Routes article. - Cycle routes (Route, Node networks) - Mountain bike routes (MTB scale, IMBA) - Hiking routes (OSMC, Network affiliation, Node networks) - Hiking trails difficulty grade (SAC scale, CAI scale) - Ski slopes - Horse routes - Whitewater sports - Running routes - Fitness trails - Travel routes (Tracks, Travel books, Points) |
| Show / Hide Topography layers | All topography data is presented as separate map layers. You can quickly switch the visibility of these layers with Quick Action. - Contour lines - Terrain (Depending on the layer selected in the Configure Map menu, Hillshade, Slope, or Altitude will be displayed.) |
| Change Terrain color scheme | Allows you to select one or more palettes from a list of existing ones, which will change when you tap the button. |
| Show / Hide Weather layers | All weather data is presented as separate map layers. With Quick Action, you can get quick access to switch the visibility of these layers on the map. - Precipitation layer - Cloud layer - Pressure layer - Wind layer - Wind animation layer - Temperature layer There is also Weather layers — a master toggle for all active weather layers. Turns off all currently enabled weather layers at once. When turned on again, restores exactly the same set of layers that were active before. |
| Open Weather screen | Opens the Weather forecast screen with the detailed information. |
| Show / Hide Favorites | Show or hide the favourite points on the map. |
| Show / Hide Tracks | Show or hide the last visible tracks on the map. |
| Show / Hide POI | Enable or disable the display of POI layers with selected categories on the map. You can select multiple POI categories. The action replaces the POI categories from the Configure Map selected without using Quick Actions. |
| Change Map mode | Quick access to switch between day and night modes. |
| Change Map sources | The button allows you to assign a single map source or a list of source that change circularly when tapped or with an interim dialog. - Show an interim dialog. Displays a dialog with a list of maps. - Do not show an interim dialog. The map sources change in a defined order. - Displayed Name - Map source >. ">" after the map name indicates which map source is currently selected. - Displayed Name - > Next map source. ">" before the map name indicates what the next selected map source will be if the action is executed. - Note. To change map sources in OsmAnd, you can either set up a single quick action that allows you to switch between multiple map sources, or create several separate quick actions, each for a specific map source. |
| Show / Hide Public transport | Enable or disable the public transport map layer - Transport type. On the first tap, you can select one or multiple transport types, including Transport stops, Bus, trolleybus, and shuttle routes, Tram and train routes, Subway routes. |
| Change Overlay | Create a list of map sources as a map overlay and cycle through them. - Note. To change map overlays in OsmAnd, you can either set up a single quick action that allows you to switch between multiple map overlays, or create several separate quick actions, each for a specific map overlay. |
| Change Underlay | Create a list of map sources as a map underlay and cycle through them. - Note. To change map overlays in OsmAnd, you can either set up a single quick action that allows you to switch between multiple map underlays, or create several separate quick actions, each for a specific map underlay. |
| Change Map style | Create a list of map styles for vector maps and cycle through them. You can show or hide the selection dialog: - If the dialog is shown, you can pick any style from the list. - If the dialog is hidden, the action works as a one-tap switch (cycle only). When cycling, the quick action label with an arrow (e.g., > Nautical) shows the next map style that will be applied on the next tap, not the currently active one. - Note. To change map styles in OsmAnd, you can either set up a single quick action that allows you to switch between multiple map overlays, or create several separate quick actions, each for a specific map style. |
| Show / Hide Mapillary layer | Allows you to view map layers with street-level imagery provided by Mapillary. |
| Show / Hide OSM notes | You can select to display or hide all OSM notes on the map with a single tap of the button. |
Interface
| Action | Description |
|---|---|
| Navigate Previous screen | A toggle to navigate to the previous screen. |
| Show / Hide Navigation view | Toggles visibility of the navigation screen view. |
| Show / Hide Search view | Opens or closes the search view. |
| Show / Hide Side menu | Toggles the visibility of the main side menu for accessing core features. |
| Turn On / Off Touch screen lock | Activates or deactivates touch screen locking to avoid unintended screen interactions. |
| Open WunderLINQ Datagrid | Opens the WunderLINQ data interface for viewing connected device information; redirects to the App Store if the required WunderLINQ app is not installed. |
Map Interactions
| Action | Description |
|---|---|
| Map Zoom in | Zooming in the map with simultaneously increasing the amount of data displayed. |
| Map Zoom out | Down scaling the map. It is convenient to use with Developer widget - Zoom level. |
| Move Map down | You can use the quick action button to move the map down. |
| Move Map up | When tapped, the map screen moves up. |
| Move Map to the left | When you tap the button, the map screen moves to the left. |
| Move Map to the right | With a quick action button, you can move the map to the right. |
| Move To My position | Moves the map to My location position. |
My Places
| Action | Description |
|---|---|
| Start / Pause Trip recording | Begin a recording session of the current track or pause to temporarily stop without completing the trip. |
| Start New trip segment | Start a new segment of the trip without stopping the overall recording. |
| Save Recorded Trip & Continue | Save the current trip recording and continue recording without interruption. |
| Finish Trip recording | End the current trip recording session. |
| Add Favorite | Adds a favorite to the selected (central) map location. - Show an interim dialog. Displays a confirmation dialog. - Group. Adds a favorite to the selected group. - Color. Adds a favorite with a preselected color - Name. Adds a favorite with the specified name prefix. |
| Add Track waypoint | Adds a new Track waypoint to the currently recording track or any track in My Places. - Show an interim dialog. Displays a confirmation dialog. - Group. Adds a favorite to the selected group. - Color. Adds a favorite with a preselected color - Name. Adds a favorite with the specified name prefix. |
| Add Map marker | Adds marker to a selected (center) map location. |
| Add Parking place | Adds parking to a selected (center) map location. The old parking position is deleted. |
| Add POI | Adds POI to a selected (center) map location map (same as context menu action). - Show an interim dialog. Displays a confirmation dialog. - POI Type (optional). Preselects the OSM POI type. - Tag/Value (multiple). Adds OpenStreetMap tags / values |
| Add OSM Note | Adds an OSM note - Show an interim dialog. Displays a confirmation dialog. - Message. Adds a default message to the note. |
| Add Media notes | Starts audio / photo / video note recording for a selected (center) map location; a repeated press stops the recording. |
| Create New route Android only | Opens the Plan a route tool and creates a route for the selected (central) location on the map. |
Navigation
| Action | Description |
|---|---|
| Add First intermediate | You can select the center of the map screen as the first intermediate point. The previous destination remains the same. |
| Turn On / Off Voice prompts | Mute or unmute voice guidance during navigation. |
| Set Start point | Mark a selected (center) map location as a point of departure. |
| Set Destination | Add the selected (central) location on the map as a destination. The previous destination becomes the last intermediate point. |
| Replace Destination | Set / Replace a selected (center) map location as a destination. The previous destination is deleted. |
| Turn On /Off Auto-zoom map | Enable or disable map auto zoom during navigation. |
| Start/stop Navigation | Start navigation (if there is a destination point present) or stop navigation. |
| Pause / Resume Navigation | Pause / Resume navigation. |
| Remote Next destination point | Removes next intermediate point, if present, otherwise removes destination and displays finish navigation dialog. Action is inactive if you don't have any destination. |
| Simulate Location by GPX | Simulates the location and movement of your device using a GPX track. |
Settings
| Action | Description |
|---|---|
| Change App profile | Create a list of application profiles and cycle through them. - Show an interim dialog. Displays a dialog with a list of profiles. - Do not show an interim dialog. The profiles change in a defined order. - Note. You can customize a single action that allows you to switch between multiple profiles, or create several separate actions, each for a specific profile. |
| Change App profile to next | Switches to the next profile in the list. |
| Change App profile to previous | Switches to the previous profile in the list. |
| Change Display position always in center (iOS Location position on screen) | Allows you to set the placement of the My Location cursor on the map. Enables or disables the cursor to always be in the center of the screen. |
| Change Map orientation | Allows you to change the map rotation mode and switch between selected orientation types. You can choose which modes to include in the cycle. |
Use Keyboard for Actions
- Android
- iOS
Menu → Settings → Profiles → General settings → External input devices → Type → +
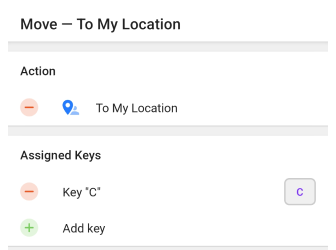
Menu → Settings → Profiles → General settings → External input devices → Device → Add

Using the Quick Action tool's functionality, you can assign required actions to the keys of your external input device. A description can be found in the Interact with Map article.