Audio / Video Notes
This feature is currently not available for the iOS version of the OsmAnd app.
Overview
Your audio and video recordings can be useful in the future, such as memories of where you've been. They are available in the My Places menu and are visible when the Audio/Video Notes plugin is enabled.
The Audio/Video Notes plugin extends OsmAnd's functionality by allowing you to create their own notes in various formats, such as photos, video, or audio, and associate them with their geographic location or current location. You can make recordings only when the plugin is on, using the Audio/Video Notes widget and/or the map context menu. The received data is automatically saved in My Places, from where it can be conveniently managed and shared.
All created audio and video notes compose the Record layer. When enabled on the map, it changes the view of the recorded data and there are more settings to manage the recordings. In the Record layer, audio and video notes are placed as POIs on the map, thus creating a user narrative visible only to the device owner.
- Android
Required Setup Parameters
The audio/video notes are provided with the Audio/video notes plugin, and require the following setup:
- Enable the Audio/video notes plugin in the Plugins section of the Main Menu.
- Add a widget to the map screen for the most convenient use.
- Customize the recording settings for each profile, if necessary.
Plugin Settings
- Android
Menu → Plugins → Audio/video notes → Settings
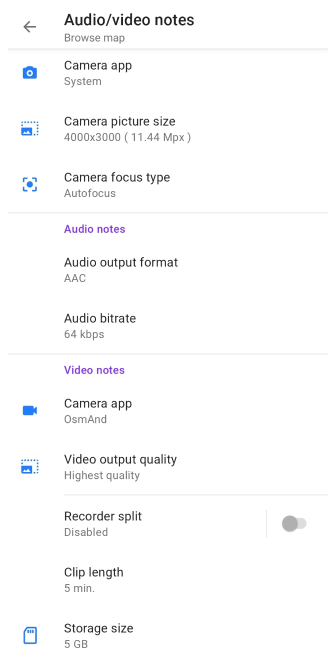
For each profile, you can configure the audio and video recording options.
| Parameter | Description |
|---|---|
| Camera app | You can choose whether to use the system app or the OsmAnd camera to take Photo notes. |
| Camera picture size | Sets the size of the photos to be taken. The camera capabilities of the device determine the number of available options. If no option is selected, the app uses the size from the system settings of the device's camera. |
| Camera focus type | Establishes the method of how camera focus is set. The number of available options is determined by the capabilities of the device camera. Basically, there are three following options: Autofocus; The camera continuously tries to focus; and Focus is set to infinity. Autofocus is the most popular one and establishes the automatic mode for the camera; continuous makes the camera detect movements and refocus accordingly; and the infinity option makes the lens focus on a distance and thus keep objects in focus no matter how far it is. |
| Camera shutter sound | If enabled, a sound is produced when the camera makes a shot. Please note, that as required by privacy law, in some countries devices will not have a camera shutter mute switch. If you use the system app, sound should be disabled in the camera app. |
| Audio output format | Provides a choice of formats for an audio file. The number of available options, and which one is used by default, is determined by the parameters of a specific device. |
| Audio bitrate | This option provides a choice of bitrate options for an audio file to be created in. The available bitrate options range from 16kbps to 128 kbps, or the Default option. The Default parameter is determined by your device's “default” microphone settings. |
| Use system app | If enabled, OsmAnd uses the system application to record video in Video notes. |
| Video output quality | This provides a choice of options that determine the format of the output image. The range of available options is determined by the parameters of a specific device. The default option is the Highest quality option. |
| Recorder split | If enabled, old video recordings will be automatically re-written and replaced with new video recordings if the storage size reaches the size limit. |
| Clip length | This determines the upper time limit for recorded video clips. There are options with a range from 1 minute to 30 minutes. |
| Storage size | This establishes the size of the storage intended for recorded video. There are options with the range from 1024 MB to 62 GB. A specific range of options, and the default option, is determined with the parameters of a specific device. A system message will remind you of the storage size reaching the established limit. |
| A/V notes | This option re-directs you to the Audio/video notes in My Places - central storage of all Audio/video notes ever made in the app. |
| Reset plugin settings to default | You can establish the default values for all of the A/V notes settings. |
| Copy from another profile | Opens a dialog to select a profile to copy the Audio/video note recording configuration from, and establish it for the current profile. |
Create a Single Note
You can create a photo, video, and audio note in any of the following ways:
- With the Widget. If the note should be tied to your current geographical position.
- With the Context menu of a point on the map. If the note should be tied to the selected point on the map.
Create & Pin Current Position
- Android
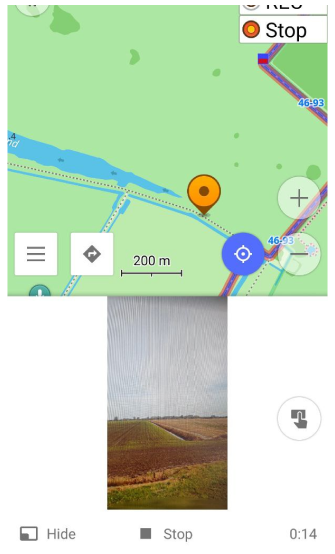
The Audio/video notes widget is used to create a note tied to your current position, and thus, avoid any search for a suitable point for a note on the map. Simply tap the widget, and make the note.
The functions provided by the Audio/video notes widget depend on how it is configured in the Configure screen menu. The widget either immediately opens the camera to make a note, according to the established settings, or asks first what format to create a note in and then opens the respective recorder dialog.
Create & Pin Selected Location
- Android
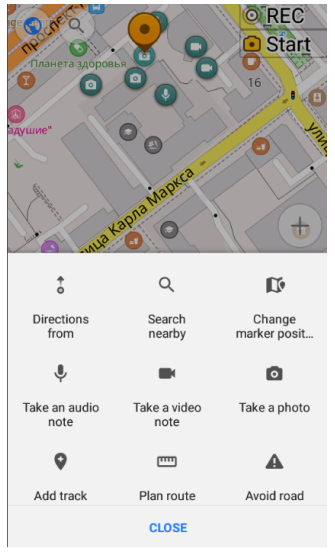
To create a note tied to a selected point on the map, use the Context menu of the point:
-
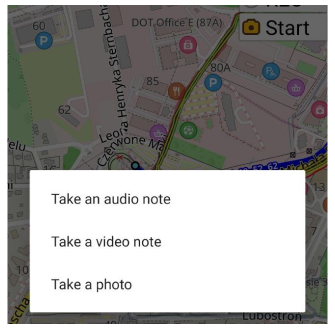
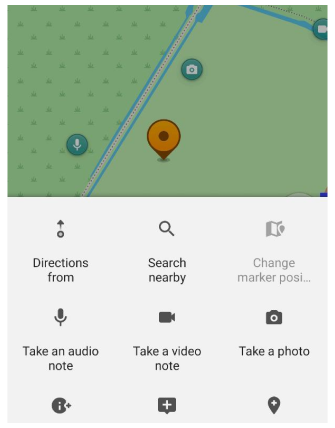
Long tap a point on the map, and the Context menu opens.
-
Tap Actions, and select one of the available options from the list:
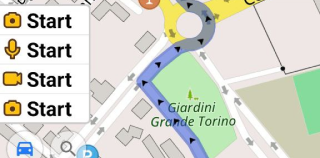
- Take an audio note - to make an audio note and tie it to the selected point on the map;
- Take a video note - to make a video note and tie it to the selected point on the map;
- Take a photo - to make a photo note and tie it to the selected point on the map.
-
Depending on the selected format of the note, the respective recorder dialog opens.
Recorder Dialog
- Android
For audio and video notes, the audio or video recorder is displayed respectively. You can:
- Stop the recording with the Stop icon.
- View the duration of the recording.
- Show or hide the video screen.
It is possible to stop the recording with a tap of the Audio/video notes widget, regardless of whether the Context menu or the widget started the recording. For a photo note, the camera functionality shows up, and you can take a photo, view the result, accept and save it, or take a new photo.
Automatically, all photo, audio, and video records are saved to: Menu → My Places → A/V notes tab.
Manage a Single Note
You can manage your information, thoughts, ideas, etc. tied to a geographical place, as follows:
- View all notes as a list in My Places.
- Show the specific note on the map.
- Rename a note in My Places.
- Show all notes on the map.
- Play the note.
- Create waypoints in a track.
- Export to JOSM.
View in My Places
- Android
Menu → My Places → A/V notes
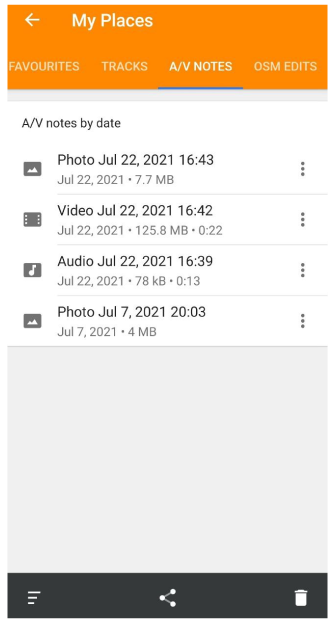
My Places is a central repository for all your notes. It allows you to view all your notes in a sorted list, display a specific note on a map, and manage your entire list of notes.
Show on the Map
- Android
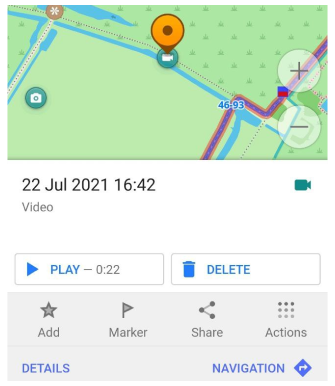
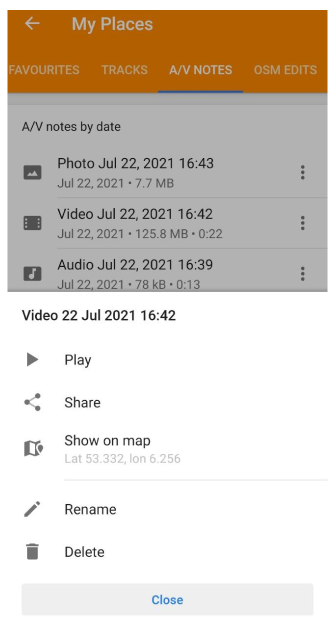
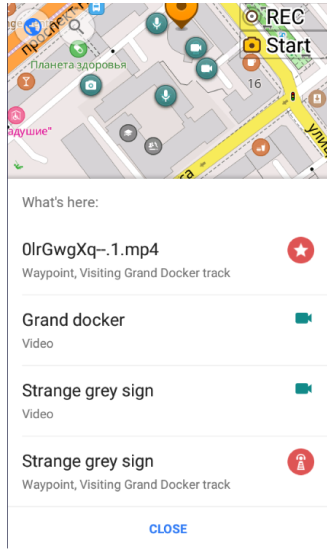
To show a specific note on the map, use the list of notes in My Places, find the needed one, and tap it. As a result, the map shows up, highlights the location of the note, and opens the Context menu. It is possible to work with the note by selecting the options in the context menu.
Play
- Android
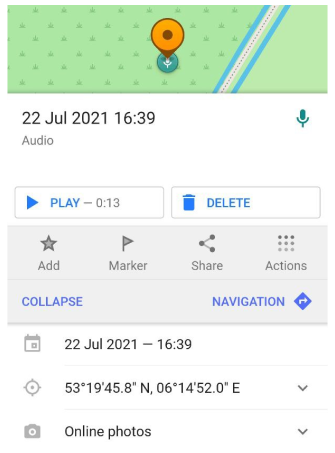
To play a note, use the respective option in the Context menu opened for the note:
- on the map;
- in My Places.
The Details section provides more data about the notes, such as latitude and longitude, the date and time of the note, and photos.
Rename, Delete, Share
- Android
To manage a note in My Places, tap the vertical triple points of the note in the list, and the available options show up, as follows:
- Play / Watch. Open and view the selected video or play the audio note.
- Share. Easily share the selected note with others via various platforms.
- Show on map. Shows the exact location and Context menu of the note on the map.
- Rename. Change the name of the note for easier identification.
- Delete. Removes notes permanently from the application.
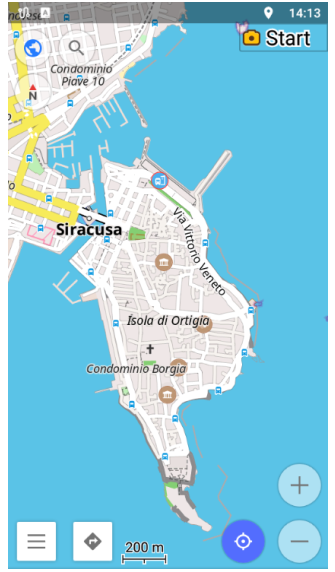
Recording Widget
- Android


The Audio/Video Notes widget creates notes, photos, audio, and video files and links them to your current position. The widget has several options that can be set as the default action performed by the widget when the screen is touched.
Adding a widget to the screen is necessary if you prefer to avoid searching for geolocation on the map and link notes to your current default location. To add or customize a widget, follow the steps below:
-
Go to:
Menu → Configure screen -
Select Left panel or Right panel.
-
Tap Audio/video notes, and the context menu of the widget opens.
-
Select the option you prefer to use by default by tapping on the widget:
-
On request - open a selection of options.
-
Record audio - start recording an audio message.
-
Record video - start recording video.
-
Take a photo - start taking photos.
-
External Input Devices
If you use an external input device (Android), you can start and stop Audio/Video Notes without touching the screen. To do this, assign the “Add audio note” or “Add video note” action to a key:
Menu → Settings → Profiles → General settings → Other → External input devices
Once assigned, the key works as a toggle:
- The first press starts recording an audio or video note (depending on the selected action).
- The second press of the same key stops the recording.
When a recording is stopped via an external input device, the Context menu is not shown, which makes it easier to use OsmAnd in fully hands-free scenarios (for example, while riding a motorbike or driving).
Manage Multiple Notes
Manage in My Places
- Android
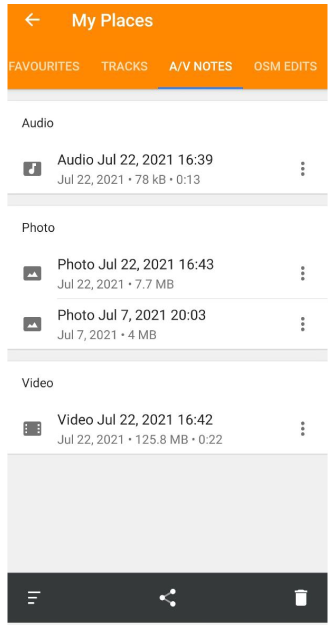
The options on the bottom bar can be used to manage the list of notes in My Places menu.
Share with GPX Waypoints
- Android
Menu → My Places → A/V notes
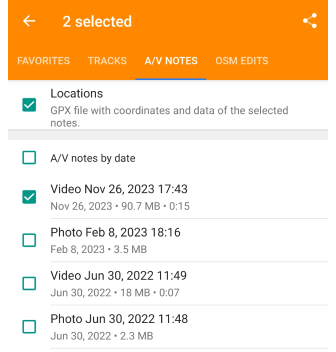
You could share all Notes including GPX that has selected notes as waypoints on My Places screen by clicking on bottom menu button share. A checkbox will appear next to each note to select specific notes. There are two checkboxes above the notes: A/V notes by date to select all notes and the Locations checkbox. The Locations checkbox allows you to add a separate GPX file with coordinates and data.
Each note contains the time it was created, the amount of data, and if it is a record, the time of recording, and location data, you can add GPX data.
Supported file formats: audio - 3gp, video - mp4, photo -jpg.
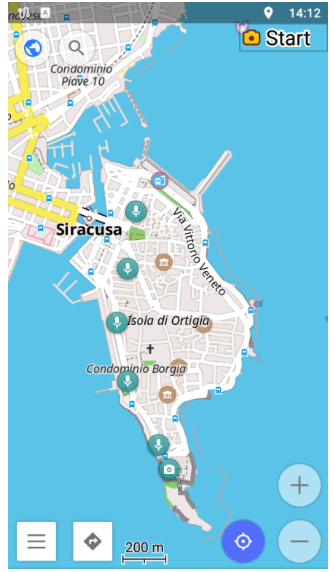
Show All on the Map
- Android
Menu → Configure map → Recording layer
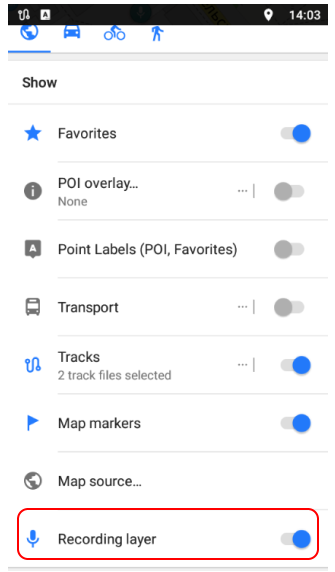
Displayed on the map notes can tell your story, where you spotted signs, what door you needed to open, where the exit is, the optimal path, and more. You can show notes one at a time or all at once.
Use the Recording map layer to show or hide all notes. If you turn it on in the Configure map menu, the Recording layer shows all notes on the map.
Waypoints Created from Notes
- Android
A waypoint is created when an audio, video, or photo note is added to a track. Waypoints exist within a track. If a track is visible, its waypoints are also visible. Thus, these notes can be visible on the map all at once or only on a specific visible track. In the latter case, the notes are displayed as waypoints of the track.
If a track is exported, the waypoints cannot be viewed, or played, because audio/video/photo notes are stored on the device only, and available only to you of that device.
Create Waypoints
- Android
There are two ways to create a waypoint: automatically and manually.
-
Automatically, a waypoint is created, in case you takes an audio/video/photo note when the Trip recording is in progress, regardless of the geolocation if it is tied to the current position or any place, and thus, regardless of the means used for that: if it is the Widget, or the Context menu.
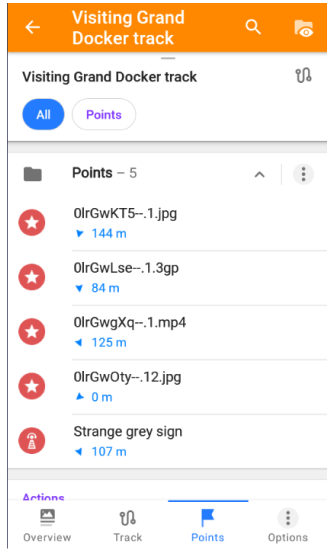
All waypoints added automatically get an automatically assigned name. The name is created, according to the format specified below for an audio/video/photo file, and has a shortlink. The example of the waypoints in the figure above shows automatically and manually created waypoints, where the first four were created automatically, and the last one - manually.
-
Manually, a waypoint is created via the Context menu, as follows:
- Select the required audio/video/photo note on the map.
- Tap Actions, and then tap Add track.
- Select the track to which you intend to add a waypoint.
- The Add track waypoint dialog opens, and allows you to set some properties, such as the name to the waypoint, an icon, color, and others. Once done, tap Save.
You can specify names for each waypoint created manually.
View Waypoints
-
A waypoint is available for viewing as a waypoint on the map and in the list of waypoints of a specific track. Deleting the waypoint does not delete the respective audio/video/photo note.
-
An audio, video, or photo note is available for viewing on the map and in the list of A/V notes in My Places. Deleting the audio, video, or photo note does not delete the respective waypoint.
-
On the map, a waypoint and an audio, video, or photo note may or may not be visible on the map. It is determined by what layer is currently toggled on for the profile.
-
When neither Tracks nor Recording layer is toggled on, both waypoints and notes can be shown by tapping them in My Places. In this case, the map shows the locations of the tapped note, or respectively, the locations of all waypoints of the tapped track.
| Visible | Layer toggled on |
|---|---|
| Only waypoints | Tracks layer |
| Waypoints and notes | Tracks and Recording layer |
| Only notes | Recording layer |
| None | Neither Tracks, not Recording layer. |
GPX File with Waypoints
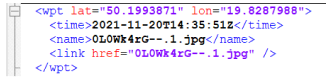
If viewing the GPX file of the track added with a waypoint from an audio/video/photo note, the waypoint will be like in the example below, having the coordinates, the timestamp, the name of the respective note, and the short link.
Miscellaneous
File Name Details
The Audio/video notes plugin generates audio/video/photo files in the following format:
{SHORTLINK_LOCATION}_Description.{avi,mp3,jpg}
where SHORTLINK_LOCATION specifies the latitude and longitude of the location to which the file is bound. The SHORTLINK_LOCATION is encoded, according to the specification of the Shortlink.
Export to JOSM
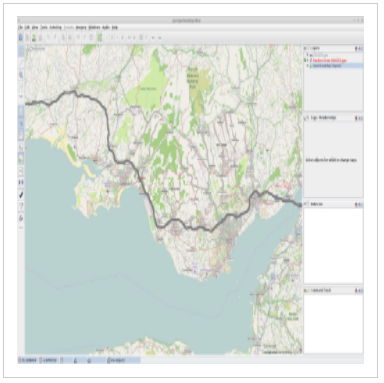
To view everything later, you can export the track along with all the media files and view them in the JOSM editor. Note that the media files must be placed in the appropriate folder. You can find out which one by clicking on the video. A notification will appear showing that there is no file available, place the correct file in the specified folder.