Trip Recording
Overview
The Trip Recording plugin is an essential tool for capturing your routes, movements, and workouts. This feature not only enables you to record your trips but also allows for easy reuse, modification, updating, and sharing of your tracks with others.
With the Trip Recording plugin, you can create new tracks, display recorded ones directly on the map, and manage existing records. It offers valuable insights into your trips, such as speed, elevation changes, terrain details, and data from external sensors. Plugin records your route, allowing for detailed analysis and sharing after your trip.
- Android
- iOS
Required Setup Parameters
To start recording tracks, you need to make the following settings:
- Enable the Trip recording plugin.
- Configure the recording settings for the required profile.
- Add Trip recording widgets to the screen (optional).
- Manage tracks on the map (optional).
New Track Recording
With the Trip Recording plugin in OsmAnd, you can easily start recording your track using a variety of convenient options. Here’s how you can begin your journey:
-
Distance/Start-Stop widget — Use to activate recording.
-
Start recording — Tap the button in the Main Menu → My Places → Tracks tab.
-
Quick Action buttons — To start recording a trip, go to Menu → Configure screen → Custom buttons → Quick action → Add action → My Places and choose Start / Pause: Trip recording.
-
Android only:
-
Go to Main Menu → Trip recording.
-
System notification — Use in the notification area of your device .
-
Application launcher — Use to start recording .
-
Recommendations:
-
Precise location — For accurate track recording, ensure that OsmAnd has this permission.
-
Troubleshooting — iOS devices may sometimes temporarily suspend or stop apps from running in the background, which could interrupt track recording.
-
Location Source (Android only) — Adjust settings in OsmAnd to choose the most suitable GPS provider for accurate recordings. Learn more here.
Start a Dialog
- Android
- iOS
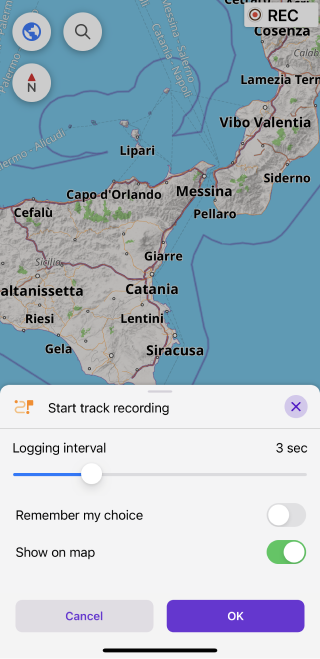
Start dialog opens, if the Show start dialog option is enabled in the settings section of the Start dialog box.

Start dialog opens, if the Remember my choice option is not toggled on.
-
Logging interval (Android/iOS). This setting controls how often the app requests data from the GPS sensor to mark new points on your track. Adjusting the interval allows you to balance between track detail and battery usage. A shorter interval will result in more detailed tracks but higher battery consumption, while a longer interval conserves battery but reduces track accuracy.
-
Line icon (Android). Tap this icon to access the Track Appearance options. Here, you can customize how your track appears on the map, including line color, thickness, and style. Once you save a track with a customized appearance, these settings will be retained for future recordings, ensuring consistency every time you view or re-enable the track.
-
Settings menu (Android). Access this menu to fine-tune your recording preferences. For a detailed overview, refer to the Trip Recording Settings section.
-
Remember my choice (iOS). When enabled, track recording starts automatically, without prompting for additional settings or confirmation. If you want to change the recording settings before starting a new track, restart the Trip Recording plugin to make the settings menu reappear.
Launcher (Android)
![]()
![]()
You can quickly start a new track recording directly from your Android device's screen using the context menu of the OsmAnd app icon.
-
Long tap the OsmAnd app icon to open the context menu, where you can find the option to Start Recording.
-
Tap the Start Recording option to launch the OsmAnd app with the track recording settings displayed on the screen.
-
Long tap the Start Recording option in the app icon context menu, to add a shortcut for quicker access.
While track recording is active, a notification badge will appear on the corner of the OsmAnd app icon, indicating that the recording is in progress. For further details on managing this notification, see the Notification section.
Current Track Recording
For Stop / Save / Pause:
-
To Stop the recording, tap the corresponding button in the Distance/Start-Stop widget dialog box.
-
(Android only) To Stop the recording, tap the Trip recording Main Menu item.
-
To Stop or Save a recording track, go to Menu → My Places → Tracks tab and tap the appropriate button in the Currently recording track field.
-
To Save, Pause, Start a new segment, or Finish recording, use the Quick Action buttons. Go to Menu → Configure screen → Custom buttons → Quick action → Add action → My Places and add one or more quick action buttons.
-
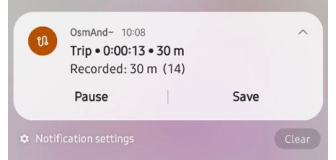
(Android only) To Pause or Save a recording track, use the system notification in the notification area of your device.
Overview Screen
- Android
- iOS


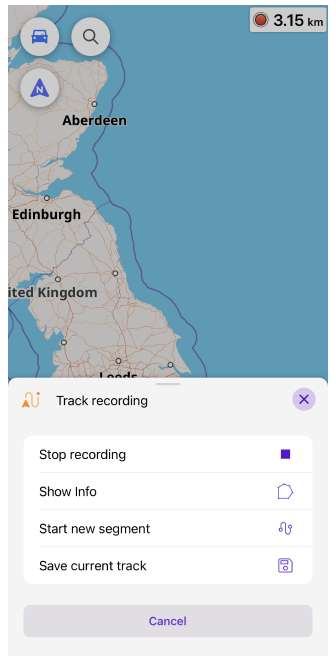

In OsmAnd, the Android and iOS versions handle the track recording interface slightly differently. On Android, you will find a dedicated menu for the Track recording context, while on iOS, this is streamlined into the Currently recording track context menu.
As you record a track, dynamic graphs are generated, providing real-time visual data about your journey. These graphs can reflect information for the entire route or just for a selected segment, depending on your zoom level.
Here is what you can find on them:
-
Data values. On the right side of the graph are the highest, lowest, and average values for the visible section of the track.
-
Graph for key information:
- Android. For the Y-axis on the graph, you can select up to two parameters from all available data such as Altitude, Slope, Speed and external sensor information. For the X-axis, select to display either Distance, Time, or Time of Day.
- iOS. The parameters are organized into tabs Overview, Altitude, and Speed with the appropriate values for the Y-axis and Distance for the X-axis.
-
Statistic. For Android, displays a constant set of statistics data independent of the graph settings: Distance, Duration, Uphill, Downhill, Average speed. For iOS, each tab, Overview, Attitude, and Speed, has a different data set.
For a more detailed view, you can scale the graph:
- Use the two-finger gesture to zoom in or out and focus on specific intervals.
- Tap on any point in the graph to display a marker that shows the exact values for that location.
| Overview tab iOS (for Android, Y-axis parameters are Altitude, Speed, and X-axis parameter is Distance). This tab displays a graph showcasing changes in speed and altitude along the length of the track, and key track details. Track data for iOS: Distance, Duration, Start Time, and End Time. DispYou can see how this is displayed in the Android and iOS versions below. |
  |
| Altitude tab iOS (for Android, Y-axis parameters are Altitude, Slope, and X-axis parameter is Distance). This tab focuses on the elevation profile of your recorded track, providing insights into altitude changes and terrain grades. Key metrics for iOS include: Average Altitude, Altitude Range, Uphill, and Downhill. The graphs below illustrate the differences between Android and iOS interfaces. |
  |
| Speed tab iOS (for Android, Y-axis parameter is Speed and X-axis parameter is Distance). The Speed tab highlights speed-related data throughout the track. For iOS, it includes information such as Average Speed, Maximum Speed, Time in Motion, and Distance Corrected. The screenshots below show how this data is displayed on both platforms. |
  |
| For Android, you can create more combinations of available Y-axis data and X-axis values. |
 |
For more details, you can explore the Tracks Context Menu, where you can manage various track-related options like renaming, deleting, or adding waypoints. To adjust how tracks appear on the map, visit the Appearance section. If you want to add specific waypoints to your current track, check out the Track Points guide. For any modifications, such as renaming a track, use the Options tab within the Tracks Context Menu.
Show on the Map
- Android
- iOS
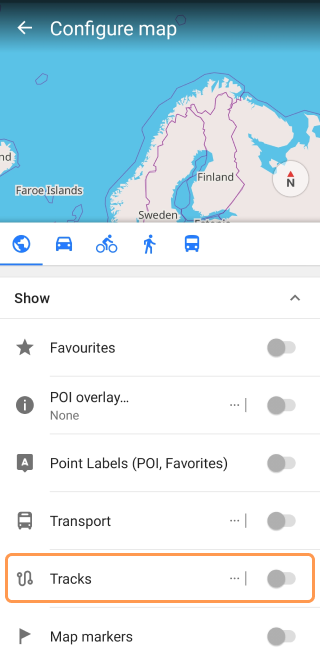
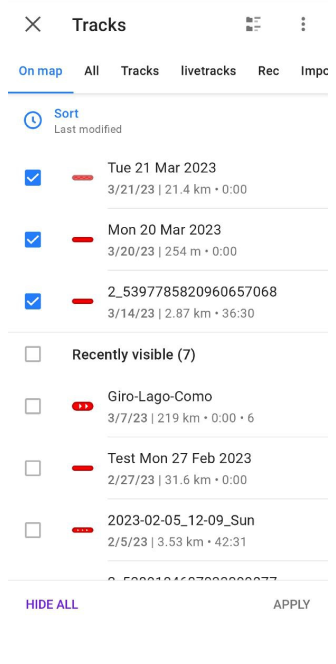
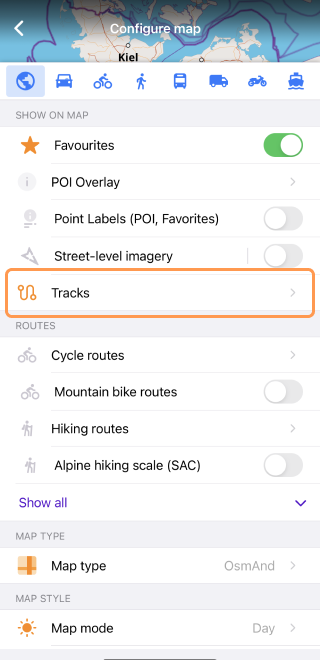
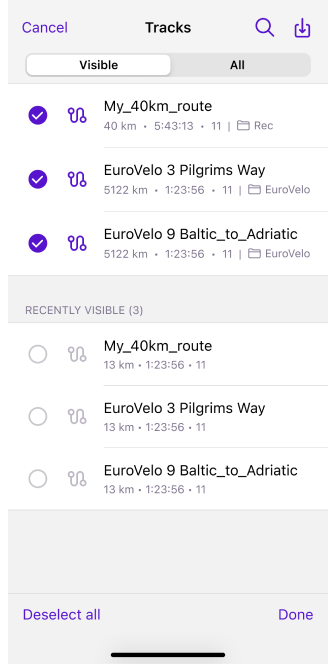
Manage which tracks are visible on your map using one of two options. Head to Menu → My Places → Tracks tab and enable the Show on map option for any track you want to display or hide. Alternatively, you can go to Menu → Configure map → Tracks to quickly adjust the visibility of all your tracks in one place.
Recorded GPX File
OsmAnd captures your journey in a structured GPX file, using a hierarchy of file > track > segments > points. Here's how it works:
- Points represent individual moments of your recorded path, each marked with attributes like coordinates, speed, altitude, and heading.
- These points are grouped to form tracks, which represent your entire route.
- If there’s a gap in recording (for instance, if tracking was paused), the next point after the break starts a new segment, marking the separation in your journey.
- Both segments and tracks are visually represented with Start and Finish icons on the map.
<extensions>
    <gpxtpx:TrackPointExtension>
        <gpxtpx:hr>107</gpxtpx:hr>
        <gpxtpx:atemp>107</gpxtpx:atemp>
        <gpxtpx:cad>107</gpxtpx:cad>
    </gpxtpx:TrackPointExtension>
</extensions>
| Parameter | Description |
|---|---|
trkpt | Track Point represents a specific geographical location detected during your activity. Each track point includes latitude and longitude coordinates, forming the basis of your recorded path. |
trkseg | Track Segment groups together consecutive track points, separated by breaks in activity, such as pauses or stops. This helps distinguish continuous movement from idle periods within a single recording. |
lat | Latitude indicates the north-south position of a point on the Earth's surface. It is one-half of the coordinate pair used to pinpoint your exact location. |
lon | Longitude specifies the east-west position, complementing latitude, to accurately locate a point on the globe. Together, latitude and longitude define your precise geographical position. |
ele | Elevation measures the height of a track point above sea level, recorded in meters. This can be useful for tracking altitude changes during your activities, such as hikes or bike rides. |
time | Timestamp records the exact date and time when a track point is logged. This allows you to track the duration and timing of your activity with precision. |
hdop | Horizontal Dilution of Precision (HDOP) is a measure of GPS accuracy, reflecting the potential error in location due to the positions of the satellites. Unlike the standard HDOP, OsmAnd GPX tracks use this value to represent horizontal accuracy in meters. Please note that this implementation differs from typical HDOP standards. Learn more. |
speed | Speed records your rate of movement in meters per second. It provides insight into your pace during various segments of your activity. |
heading | Heading indicates the direction in which your vehicle or device's front is pointed, measured in degrees. It's distinct from the course, which is the actual path of movement. Differences can occur due to external factors like wind, currents, or road conditions. More on heading. |
speed_sensor | Speed from external sensors captures data from connected sensors, providing more precise speed information, especially useful when cycling. For more details, refer to the GPX file format documentation. |
cadence | Cadence measures the number of pedal revolutions per minute, recorded using external sensors. This is particularly useful for cyclists aiming to monitor and optimize their pedaling efficiency. Read more. |
power | Bicycle Power quantifies the power generated while pedaling, captured from external sensors. It's an essential metric for serious cyclists who want to gauge their performance. Learn more. |
atemp | Air Temperature records the ambient air temperature during your activity, measured using external sensors. Note that water temperature is not supported. Details here. |
hr | Heart Rate monitors your heartbeats per minute, using data from connected sensors. This information can be vital for tracking your cardiovascular performance during workouts. Find out more. |
Recording Settings
Before you start tracking your trips, you need to properly configure the Trip Recording plugin for optimal performance.
-
Profile-specific settings. Each profile in the app can have its own unique Trip Recording settings. This allows you to precisely customize the recording behavior based on your activity, such as driving, cycling, or even Nordic walking, which might require different configurations.
-
Customize recording parameters. The recording settings can vary depending on how you move. For example, driving long distances might call for a lower recording frequency, while hiking or walking could benefit from more frequent updates.
-
Precise location data. To ensure that your recordings are smooth and usable for future use, you can customize the way you capture location points. This could include adjusting the recording frequency, the format of your data (like the number of points per distance unit), or spacing between recorded points.
-
Global settings. Trip Recording settings are configured per profile, which you can manage in the app’s global settings. Before you customize the Trip Recording plugin, select the profile you want to configure from the profiles section. From there, navigate to the profile’s settings to access the Trip Recording options.
- Android
- iOS

| Parameter | Description |
|---|---|
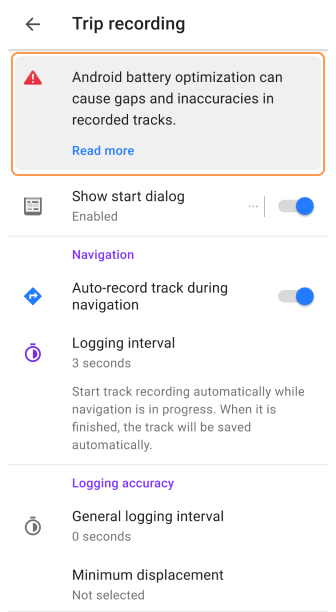
| Battery optimization dialogue (Android) | Opens the Android battery optimization settings. Tap the Don't ask anymore if you do not want to be prompted again. |
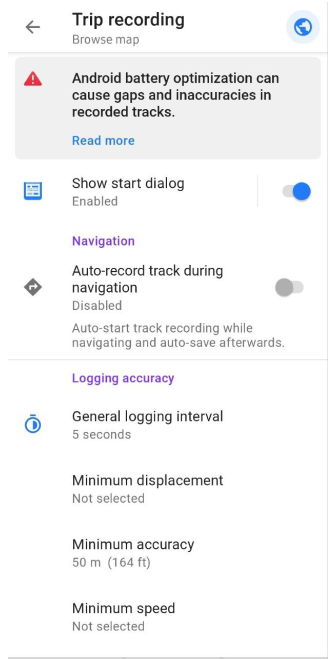
| Show start dialog (Android) | Enables a dialog where you can configure settings before starting recording. If disabled, the recording starts automatically. |
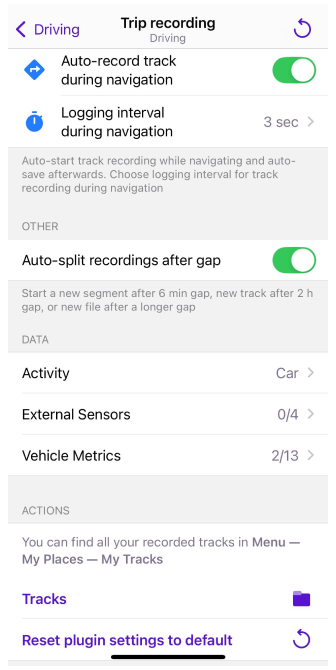
| Auto-record track during navigation | Automatically records the track during navigation and saves it in the Menu → Trip recording tab. Note: Track recording consumes battery and continues running in the background, even if the screen is off. |
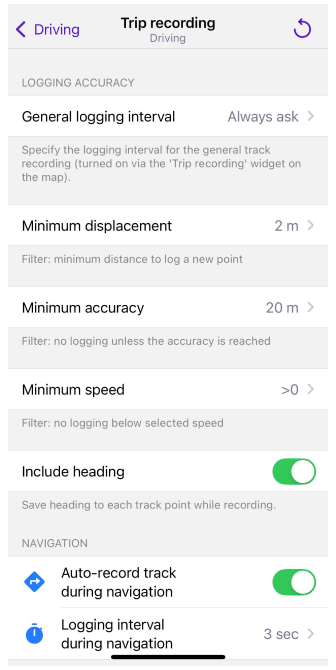
| General logging interval | Defines how often location points are recorded. The default is 5 seconds. It is enabled with the Trip recording widget. |
| Minimum displacement | A filter to avoid recording points when there is little or no movement. It helps reduce data noise.
|
| Minimum accuracy | Filters out location points below a minimum accuracy indication threshold, as reported by the device.
RemarkSuppose the GPS was turned off just before recording. In that case, the first measured point may have reduced accuracy, so it is better to wait a while before recording the point or record the best of 3 consecutive points. |
| Minimum speed | Sets a threshold to ignore points recorded below a certain speed.
RemarkTry using the motion detection via the logging minimum displacement filter (B) first, it may produce better results, and you will lose less data. If your tracks remain noisy at low speeds, try non-zero values here. Please note that some measurements may not report any speed value at all (some network-based methods), in which case you would not record anything.Speed > 0 check: Most GPS chipsets report a speed value only if the algorithm determines you are in motion, and none if you are not. Hence using the > 0 setting in this filter in a sense uses the motion detection of the GPS chipset. But even if not filtered here at recording time, we still use this feature in our GPX analysis to determine the Distance corrected, i.e. the value displayed in that field is the distance recorded while in motion. |
| Auto-split recordings after gap | Automatically splits tracks based on time gaps between recorded points.
RemarkA gap is identified when no points are recorded. This may happen either because the location is not detected or because it is detected but not recorded. Several factors can cause this, including weak GPS signals due to poor weather conditions, or the speed of movement falling below the configured threshold. In such cases, even though the device may detect the location, it does not record it.These gaps in recorded data can trigger the creation of a new segment within the same track, a new track in the same file, or a new GPX file within one recording. This is managed within a single start/stop recording session. |
| Prevent standalone logging (Android) | Pauses track recording when the OsmAnd app is killed (via recent apps). The background indication is not displayed in the Android notification panel. |
| Include heading | Records the heading (direction of movement) for each point in the GPX file. The heading is the direction the device is facing, which can differ from the movement direction due to external factors like wind or skidding. |
| Activity | The option allows you to pre-select an activity type for a profile, which is then automatically applied to all recorded tracks. |
| External sensors Need plugin enabled | Data from external sensors such as Heart Rate, or Bicycle Speed is logged to the GPX file. Distance data is not recorded on Android or iOS. Displayed only when the External Sensors plugin is enabled. |
| Vehicle Metrics Need plugin enabled | Data from OBD-II scanner is logged to the GPX file. Displayed only when the Vehicle Metrics plugin is enabled. Note: You can add which metrics to record in the GPX file from the list: Menu → Plugins → Trip recording → Settings |
| Track storage folder (Android) | Defines where in Menu → My Places → Tracks tab recorded tracks are stored. Options include storing all tracks in the Rec folder or organizing them by month, such as Rec/yyyyy-mm. |
| Notification | Controls the display of a trip recording system notification in the notification area of the device that allows you to start recording trips. |
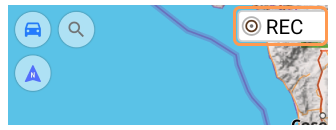
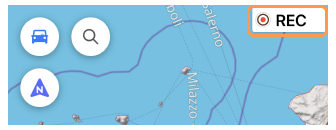
| Online tracking (Android) | Allows real-time tracking of your location by sending recorded points to a specified URL. The tracking interval determines how often points are sent, and the time buffer stores points when there’s no Internet connection.RemarkIf this option is enabled, and track recording is in progress, the Distance/Start-Stop (REC) widget turns green instead of red, indicating that each recorded point is being transmitted to a specified URL. The Web address field allows you to input the URL using the following parameter format:
OsmAnd stores the unsent location points only in the app’s temporary memory while the application is running. This means that the buffer is not written to permanent storage. If the app is closed, force-stopped, or the device restarts, all buffered points are lost. The Time Buffer setting does not define how long points are kept in memory — it only works as a filter at the moment of uploading. When OsmAnd attempts to send buffered points, each point is checked against the Time Buffer limit. Points older than the selected limit (e.g., 24 hours) are removed instead of being uploaded. As a result, the buffer may temporarily contain points older than the chosen Time Buffer value, but these points will be discarded during the upload process. |
| Tracks | A quick reference to the folder where tracks are saved Menu → My Places → Tracks tab. |
| Reset plugin settings to default | Resets all trip recording settings for the current profile to their defaults. |
| Copy from another profile (Android) | Copies the trip recording settings from one profile to another. |
Battery Optimization
This feature is currently not available for the iOS version of the OsmAnd app.
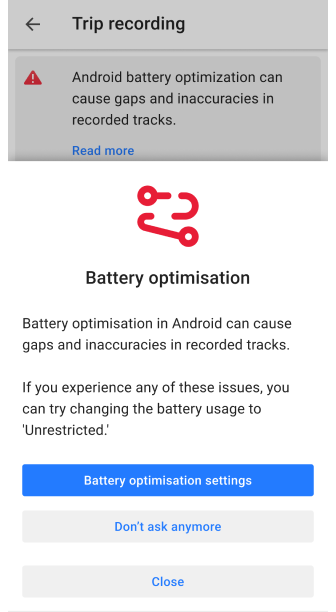
This feature allows you to manage battery optimization settings for OsmAnd to ensure uninterrupted access to your location, even when the app runs in the background during navigation or track recording.
- Battery optimization settings. Opens Android settings, where you can modify battery-saving preferences for OsmAnd. More details here.
- Don't ask anymore. Dismisses the dialog box permanently, so it will not appear again.
- Close. Temporarily closes the dialog box, which will appear again the next time battery optimization needs attention.
Notifications
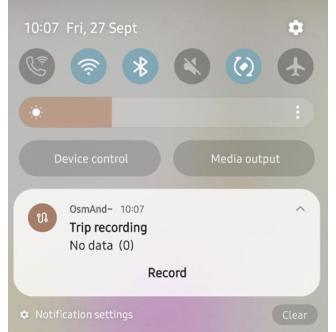
If Notification is enabled in the plugin settings, trip recording notifications will always be displayed in the system notification area when the recording is active. This notification ensures that the recording process is not interrupted by the system, and it cannot be disabled during an active recording.
- The notification area opens when you swipe down from the top of the screen and closes when swiping up. These messages notify you of actions like starting/stopping trip recording, especially when automatic recording is enabled during navigation.
- Notifications remain visible regardless of whether the app is running in the foreground, background, or is closed. You can manually clear the old notification if it is no longer needed, but this will not stop the ongoing recording.
Important note.
This behavior is required by Android for any foreground service, like trip recording, to remain visible to you.
- If the notification is removed, Android will automatically stop the recording. You can use the Prevent standalone logging setting.
- The Notification setting in OsmAnd affects whether the notification bar shows a shortcut to start a recording when no recording is active. It does not control the visibility of the notification during an active recording.
Additional Android options.
- In Android settings → Notifications and status bar → Lock screen notifications, you can remove OsmAnd from the app list to prevent notifications from appearing on the lock screen, avoiding accidental screen activation. This will not affect track recording. Notifications will still appear in the regular notification area.
- OsmAnd may also appear under Privacy → Special Permissions → Turn on screen. If you want to prevent the screen from turning on when a notification appears, try removing OsmAnd from this list.
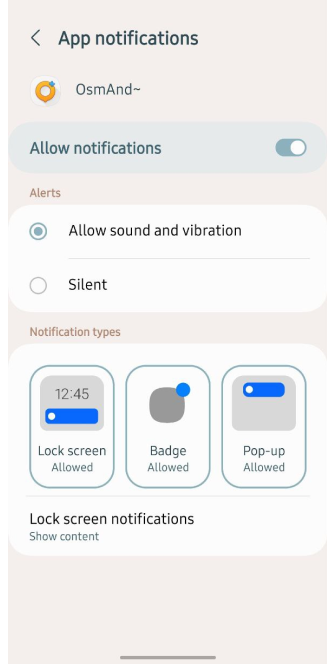
Badge notification.
![]()
The app icon badge appears next to the OsmAnd icon when the track recording is active.
- This icon disappears when the track recording is complete. To check if a recording is active, you can go to Menu → My Places → Tracks tab or tap the widget to manage the recording.
- If there is no recording in progress and the badge is still displayed, it may mean that a message from OsmAnd has been left in the device notification panel.
- To disable badges in Android settings, go to device Settings → Apps → OsmAnd → Notifications and disable the badge display option for this app.
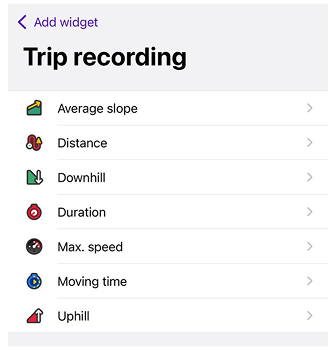
Widgets
Widgets allow you to display key information about track recording directly on the screen, such as Average Slope, Distance, Downhill, Duration, Max Speed, Moving Time, and Uphill. On Android, you can also add Average Speed widget.
To start using Trip recording widgets, you need to make all the following settings:
- Enable the plugin.
- Configure trip recording settings for the required profile.
- Add the necessary Trip recording widgets to the screen. Note that this configuration is specific to each profile.
Add Recording Widget
- Android
- iOS
Go to: Menu → Configure screen → Widgets → Choose a panel → Trip recording

Go to: Menu → Configure screen → Widgets → Choose a panel → Trip recording
The Trip Recording widget provides an easy way to monitor your recording status and quickly access recording settings and details. This widget is automatically added to your screen when the Trip Recording plugin is enabled.
To customize your interface, you can add or remove the Trip Recording widget and other widgets through the Configure Screen menu.
Display Modes
- Android
- iOS


Some Trip Recording widgets support multiple display modes. Modes let you switch between overall trip values and metrics for the most recent uphill or downhill section of the currently recorded trip.
| Widget | Available modes |
|---|---|
| Average Slope | Last downhill; Last uphill |
| Average Speed (Android only) | Trip average (default); Last downhill; Last uphill |
| Distance (Start-Stop) | Trip average (default); Last downhill; Last uphill |
| Downhill | Total (default); Last downhill |
| Max Speed | Total (default); Last downhill; Last uphill |
| Moving Time | Total (default); Last downhill; Last uphill |
| Uphill | Total (default); Last uphill |
Mode switching depends on the widget:
- Uphill / Downhill / Max Speed / Average Slope / Moving Time / Average Speed — tap the widget on the map to switch its mode.
- Distance (Start-Stop) — the Distance widget supports multiple display modes (select them in the widget settings), but tapping it always opens the Trip Recording dialog, where you can start, stop, and view detailed information about your track.
If the current recording does not yet contain an uphill or downhill section, widgets in Last uphill or Last downhill mode show 0 or — (no data).
Notes: Modes apply to the currently recorded trip and update as the recording continues.
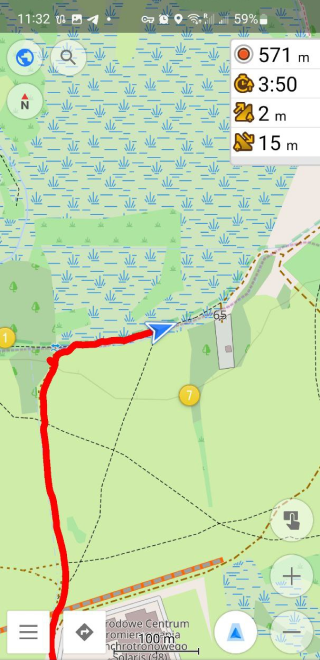
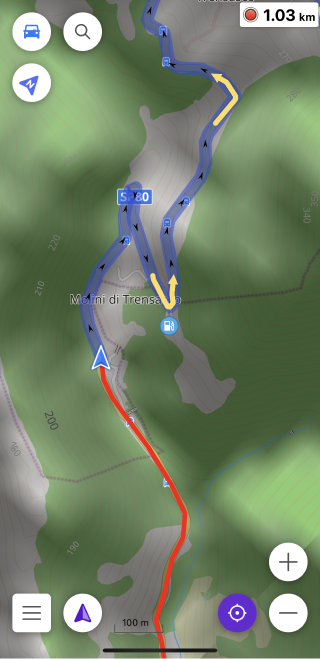
Distance (Start-Stop)
| Distance/Start-Stop. This widget displays the distance of your ongoing trip recording. It is automatically added when the Trip Recording plugin is enabled, but you can hide it through the Configure Screen menu. The widget features three distinct states: Recording, Paused, and Inactive, each indicating the current status of your trip recording. |
| To open the Trip Recording dialog when tapping an inactive widget, enable the Show Startup Dialog option in the Trip Recording plugin settings. If the option is disabled, recording will start immediately after tapping the widget without opening the dialog. |
Additional Widgets
| Average Slope. Displays the average slope for the last uphill or downhill section of the current trip, depending on the selected mode. |
| Average Speed (Android only). Shows the average speed for the currently recorded trip, or the average speed during the last uphill or downhill section, depending on the selected mode. |
| Downhill. Indicates the total descent or the last descent section, depending on the selected mode. |
| Duration. Displays the total time of the current trip recording in hours and minutes. |
| Max Speed. Shows the maximum speed for the currently recorded trip in the selected mode. |
| Moving Time. Shows the moving time for the currently recorded trip, or the time for the last uphill and downhill, depending on the selected mode. |
| Uphill. Shows the total ascent or the last ascent section, depending on the selected mode. |
If you have multiple widgets selected, you can access the same dialog box for each without needing to switch or close it. This unified interface makes it easy to view and manage all related information seamlessly.
Related Articles
Common Issues and Solutions
-
Trip Recording does not start.
- Ensure the Trip Recording plugin is enabled: Menu → Plugins → Trip Recording → Enable.
- Check that the settings are correct: Menu → Configure Profile → Plugin Settings → Trip Recording.
- If recording still doesn’t start, restart the app and try again.
-
Trip Recording stops unexpectedly.
- Check if the your device’s battery optimization settings are stopping the recording. Some devices may pause background activity to save power. Go to Device Settings → Battery.
-
Recorded distance does not match actual distance.
- Verify that GPS is enabled and has an active signal.
- Reduce GPS accuracy threshold: Menu → Configure Profile → Trip Recording → Minimum Accuracy.
-
Recorded Tracks are Noisy. (check).
-
Recorded Tracks Have Gaps. (check)
-
How to Track Traveled Distance. (check)
For additional troubleshooting, visit: Track Recording Troubleshooting.